![]()
Most reports are available for either Institutional or Professional claims, but some reports are specific to a type of claim.
In the Reports component of the firstREV interface, users can view daily reports for information transmitted in a certain date range, by an individual user, or to a specific payer. This allows users to access an array of data from one central location, instead of clicking through numerous individual claims to obtain the same information. For instance, users can find out work that must be completed for any rejected claims or claims that contain errors.
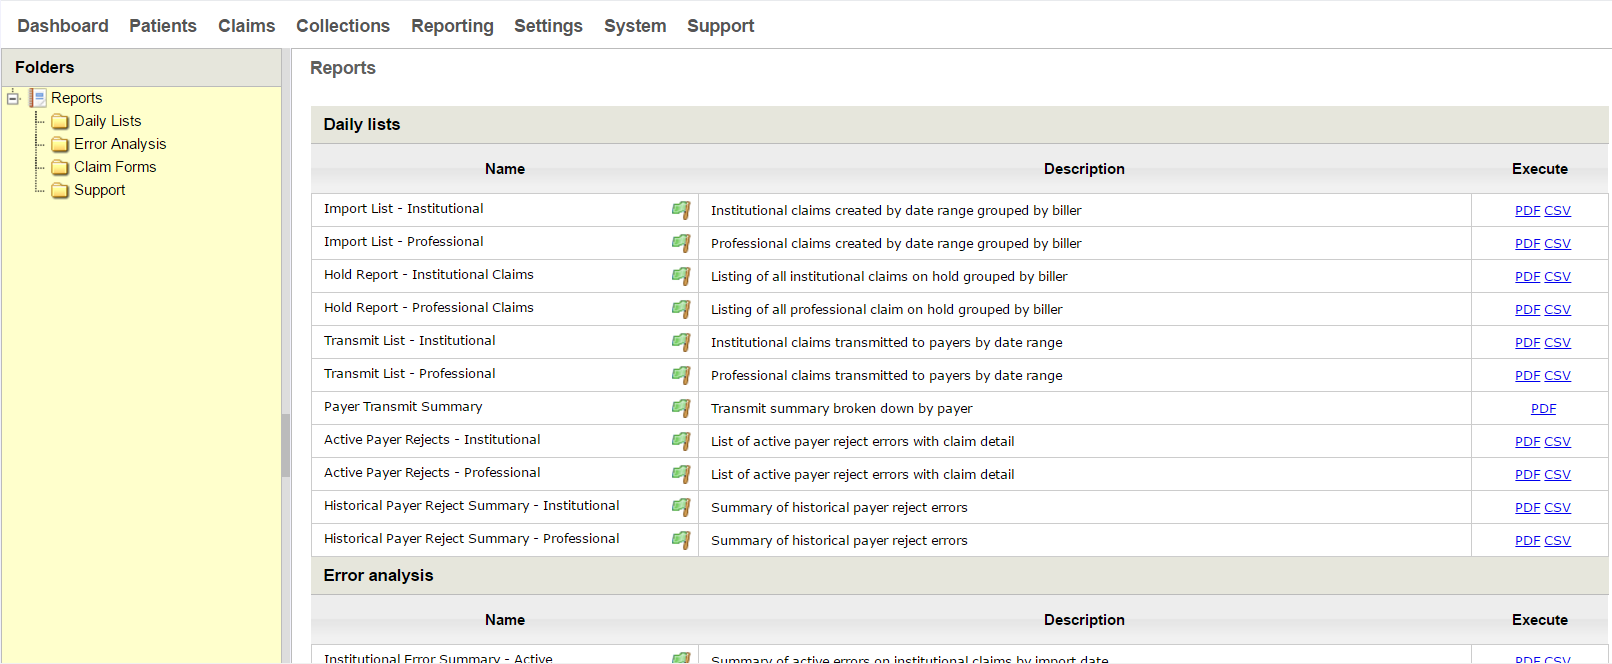
Access firstREV reports by clicking the appropriate quick link in the Dashboard screen or click Reporting from the toolbar and then select Reports. As seen in the sample image below, all available reports are listed on the Reports screen, which are grouped accordingly (e.g. Daily lists, Error analysis, etc.).
|
|
Most reports are available for either Institutional or Professional claims, but some reports are specific to a type of claim. |
All reports included in the firstREV Reports screen are grouped into four different categories. The chart below includes a list of all default reports that are available in firstREV, including the name of the report, a brief description of the report, and which type of file can be used to export report data. Sample images for various types of reports are included after this chart.
|
Name |
Description |
File |
|
Daily Lists |
||
|
Import List - Institutional |
Institutional claims created by date range grouped by biller |
.pdf / .csv |
|
Import List - Professional |
Professional claims created by date range grouped by biller |
.pdf / .csv |
|
Hold Report - Institutional Claims |
Listing of all institutional claims on hold grouped by biller |
.pdf / .csv |
|
Hold Report - Professional Claims |
Listing of all professional claims on hold grouped by biller |
.pdf / .csv |
|
Transmit List - Institutional |
Institutional claims transmitted to payers by date range |
.pdf / .csv |
|
Transmit List - Professional |
Professional claims transmitted to payers by date range |
.pdf / .csv |
|
Payer Transmit Summary |
Transmit summary broken down by payer |
|
|
Active Payer Rejects - Institutional |
List of active payer reject errors with claim detail |
.pdf / .csv |
|
Active Payer Rejects - Professional |
List of active payer reject errors with claim detail |
.pdf / .csv |
|
Historical Payer Reject Summary - Institutional |
Summary of historical payer reject errors for institutional claims |
.pdf / .csv |
|
Historical Payer Reject Summary - Professional |
Summary of historical payer reject errors for professional claims |
.pdf / .csv |
|
Error analysis |
||
|
Institutional Error Summary - Active |
Summary of active errors on institutional claims by import date |
.pdf / .csv |
|
Professional Error Summary - Active |
Summary of active errors on professional claims for a given date range |
.pdf / .csv |
|
Institutional Error Summary - Historical |
Summary of historical errors on institutional claims by import date |
.pdf / .csv |
|
Professional Error Summary - Historical |
Summary of historical errors for professional claims for a given date range |
.pdf / .csv |
|
Override Report - Institutional |
List of all errors that have been overriden by import date |
.pdf / .csv |
|
Override Report - Professional |
List of all errors that have been overriden by import date |
.pdf / .csv |
|
Daily Validation Rate Summary |
Summary of Accepted/Rejected status of claims after import |
|
|
Claim forms |
||
|
UB-04 Local Prints |
UB-04 local print claims that have been released by import date. |
|
|
HCFA-1505 Local Prints |
HCFA-1505 local print claims that have been released by import date. |
|
|
UB-04 Secondary Claims with EOB |
All local print released secondary UB-04 claims with EOB. |
|
|
HCFA-1505 Secondary Claims with EOB |
All local print released secondary HCFA-1505 claims with EOB. |
|
|
Support |
||
|
Payer List |
Payer Master Listing |
.pdf / .csv |
As long as there is existing data, users can download and/or print files for any of the available reports in firstREV. Follow the brief process below to download and print one of the available reports in firstREV:
1. From the toolbar, click Reporting and then select Reports.
2. Search through the list to find the report that you want to print from the list. All available reports are grouped into four default categories: Daily Lists, Error Analysis, Claim Forms, Support.
3. In the Execute column, click the link for the corresponding file type you want to download (PDF, CSV).
4. You must then enter parameters for the report in the interactive prompt that displays (e.g. Import Date Range, Transmit Date Range, Report Criteria). The specific parameters prompt that displays will depend on which report you have selected.
5. After specifying the parameters, click Run Report.
6. Click the link in the Download is Ready prompt that displays. The corresponding report file will automatically download in your browser as a .pdf file or a .csv file, depending on the initial link that you selected.
Users can create custom reports for any grid in firstREV that contains an Export Wizard ( ) feature (Learn more about “Grid Control Icons” in the Grid Functionality topic). Use this feature to specify pieces of data to use in the report and then generate all of the information as a .pdf or .csv file.
To create a customized report for a data grid:
1. Navigate to the data grid you want to create a report for (e.g. Institutional Claims ) by selecting the appropriate options from the toolbar (e.g. Claims | Institutional).
2. While viewing the grid, click to open the Export Wizard prompt, as seen in the sample image.
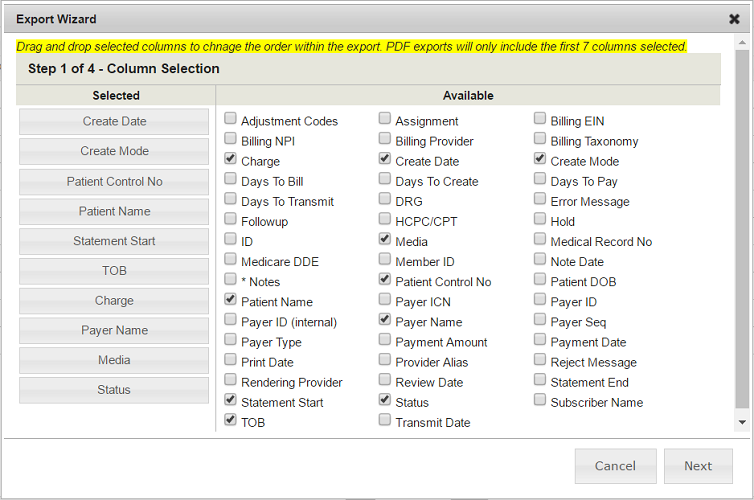
3. Use the interactive prompt to specify data that is included in the report and how it is arranged. In the Available section, check the box next to an item (e.g. Adjustment Codes, Payer Name, TOB) to include the corresponding information in the report. Currently selected items display in the Selected section.
4. Use the Selected column to arrange the order of each selected column of data. The order of items listed in this section (from top to bottom) will display in the report in this same sequence (from left to right). To change this order, use drag-and-drop functionality to rearrange this list, as desired.
5. After all appropriate items are selected and columns of data are arranged correctly, click Next.
6. In the Row Selection step, specify how many rows of grid data are included in the report. By default, this is set to Include All Rows of data in the report. If desired, you can select the Limit radio button and then enter a number in the text field to implement a limit for the report. For example, if the Limit option is selected and “100” is entered in the text field, the report will only include the first 100 records of grid data (if applicable).
7. Click Next.
8. In the Filename field, enter the specific text you want to use as the report filename.
9. In the Format field, click the drop-down menu and select either PDF or CSV to choose the type of file firstREV will generate the report data in.
|
|
PDF export files are only able to use the first seven columns of data selected and are limited to 10,000 rows of data. |
10. Click Export. The report file automatically downloads within your browser.