Just as users are able to utilize a wide range of customization options for viewing data, users also have access to large number of settings that they can adjust in firstREV as well. Please note that some of settings available may be dependent upon permissions established for your user account. As there are numerous configurations possible in firstREV, this section does not cover all available settings options comprehensively, but briefly touches on areas that users can access from the Settings component of the toolbar.
Furthermore, some key information is included that contains pertinent information for a particular area that is available in Settings. For example, in My Account, there is an option to either release clean claims automatically (once validated) or require users to manually release claims. Additionally, there is information related to the Payers area that instructs users how to enroll payers.
This area allows users to update and edit information and settings for their own user account. When a user selects My Account, after selecting Settings from the toolbar, the Edit User screen displays with options detailed in the following sections.
General tab
This is the initial tab that is selected when the Edit User screen is accessed. Interact with fields in the User Properties section to add information, or edit existing information, associated with the user account (e.g. First Name, Last Name, Email, Phone, etc.). Additionally, the Medicare FSS Access information (user name and password is managed on this tab).
Settings tab
This tab allows users to customize settings for their user account and contains a variety of different options. For example, users can specify the amount of time before a timeout occurs, how claims are released, how claim forms are printed, and more. These settings are grouped into the following sections:
1 System Settings
2 Transaction Settings
3 Claim Settings
4 UB-04 Form Print Settings
5 HCFA-1500 Form Print Settings
6 Realtime Settings
User Settings Window
While viewing either tab in My Account, additional controls and details are available in a window to the right:
7 Tools — Contains several control options that are related to user settings:
A Save — Save the current information entered in user settings.
B Change Password — Use the prompt to update the account with a new, secure password.
C Reset Password — Reset the password for the corresponding user account.
D Create New User — Use this to begin creating a new user, from a blank account record.
8 Statistics — Displays the Status of the user account, the Last Login, and when the Password Expires.
For each user, your agency must decide if firstREV will release clean claims automatically (once validated) or if users must manually release claims. This option must be set by each individual user (in My Account).
In the “Claim Settings” section, set the Release When Validated By User option to “No” to require users to manually validate and release claims. If this option is set to “Yes”, firstREV will automatically release claims upon import (manually or from EE) if they contain no errors.
The Groups area contains all existing user groups within the agency’s firstREV account. Records in the Groups grid are synchronized with the records that are entered in firstHOMECARE or firstHOSPICE (in References Files | firstREV User Groups). Refer to the Assigning Permissions for firstREV Users topic for instructions on how to assign a firstREV user to a user group from within the Enterprise Edition software.
By default, the following user groups are established for each agency:
1 Administration — Users are able to access all menu options available in firstREV.
2 Intake Coordinator — Users have access to Patients, Eligibility, and Support menu options.
3 Billing Coordinator — Users have access to Patients, Claims, Collections, Reports, Settings, and Support menu options.
|
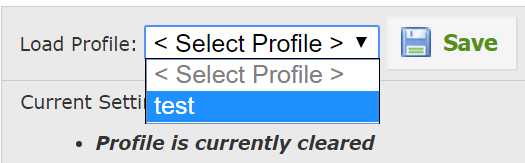
Any settings that are applied to a grid (whether from the Filters tab or Sorting tab) will remain until they are cleared by the user. |
Administrative users can create groups within the application to give certain users specific access. Select Settings and then Groups in the menu bar at the top of the screen to display the Groups grid. To add a group, select . To edit which users are included in a group, select
. To delete a group, select the
icon.
The Profiles area is used to establish a custom settings “profile” for any of the data grids available throughout firstREV (e.g. Institutional Claims, Remit (Payments), Users, etc.). Each of the grid options available are listed exactly how they are labeled above the corresponding grid. There is no limit to how many grids can be setup for any individual profile that is created. For instance, a user can create one profile and establish customized Profiler settings for every data grid in firstREV.
Users can create each profile with a unique name and make it available to all users or only their own account. If there are any profiles setup for a grid, a Load Profile section will be available at the top of the Profiler (as seen in sample image).
Simply use the drop-down menu to select the desired profile and then click Apply. Additionally, the settings associated with the selected profile (for the grid that’s currently being viewed) can be updated by clicking Save. Any options selected in the Filters or Sorting tab of the Profiler will be applied for the corresponding grid in the selected profile.
To view, edit, or create profiles, select Settings and then Profiles in the menu bar at the top of the screen to display the Profiles grid. To add a profile, select the button. To edit filters, click
. To delete a profile, click the
icon.
The Entities area of firstREV is used to create a new entity (i.e. Facility/Group or Physician), import a list of entities (using an Excel spreadsheet or .csv file), or manage details for existing entity records in the database. Furthermore, this feature allows users to add billing providers or other entities and use them as a shortcut for claim creation, instead of manually entering the information each time. Users must ensure that data they enter matches the actual information for each entity.
Using the toolbar, select Settings and then Entities in the menu bar at the top of the screen to display the Entities grid. To add an entity, hover over the Tools tab and then select New Entity. Enter all of the appropriate information for the new entity and then click Save. Select to edit entity properties, primary or alternate addresses, or entity identification details (i.e. EIN, NPI, Social Security Number, or any other IDs or numbers associated with the entity record. To delete an entity record, click
).
In the Payers area, users can view a master list of all payers that are available in the agency’s firstREV account. The Payers grid displays the Name, Payer ID, and Status for each record in the grid. Additionally, four “Enroll Req” columns are included to indicate if additional enrollment is required for a certain feature in firstREV (i.e. Institutional Claims, Professional Claims, ERA, Eligibility Requests).
Users can view a master list of all available payers by clicking Settings from the toolbar and then selecting Payers. This will display the Payers grid.
Quick Search Payer Information
For convenience, some commonly searched payer information is listed below. If applicable, enter the appropriate information in the Quick Search feature to search for a specific payer name or ID.
1 For CGS:
A Payer ID: 15004 Payer Name: Medicare Home Health and Hospice J15
2 For NGS:
A Payer ID: 06001 Payer Name: Medicare Wisconsin (WI)
B Payer ID: 06014 Payer Name: Medicare Home Health and Hospice J6
C Payer ID: 14011 Payer Name: Medicare Home Health and Hospice JK
3 For Palmetto GBA:
A Payer ID: 11001 Payer Name: Medicare Home Health and Hospice JM
Viewing Details for a Payer
To view details for a payer, click Enroll/Manage in the Action column, or click anywhere in the corresponding row of the grid to display the Payer Management screen for the selected payer. Different data is available contained in the corresponding payer information tabs located at the top of the Payer Management screen.
|
As each payer is different, not all tabs will be available for every payer. |
Payer Information Tabs
firstREV groups information for each payer into separate payer information tabs, according to the type of data that is included in the tab:
1 Institutional Claim
2 Professional Claim
3 Eligibility
4 Claim Status
5 Remittance
|
If additional enrollment is required, the corresponding tab will not be available for that payer (e.g. Institutional Claim, Eligibility ) until it is completed. Refer to the Enrolling Payers in firstREV for instructions on how to submit additional enrollment forms. |
Payer Control Tabs
Additionally, some of the payer information tabs that are available in the Payer Management screen also include the following payer control tabs:
6 Enrollment — Any Enrollment Records associated with the selected payer will display in this tab (if applicable). Additionally, this tab is used to create an enrollment for the corresponding type of information (e.g. Institutional Claim, Eligibility). Refer to the Enrolling Payers in firstREV topic for more information about this.
7 Matching — Any Matching Records associated with the selected payer will display in this tab (if applicable). Additionally, this tab is used to create a match for the selected payer. Refer to the Setting Up Payer Matching topic for more information about this.
8 Settings — Contains additional options that users can adjust for the selected payer, including:
A Payer Name Override
B Payer Address Override
C Automatic Eligibility Queries
D Estimator
E Other Payer Defaults