HEALTHCAREfirst is working to provide a new Care Planning feature in Enterprise Edition that will optimize the process clinicians use to create patient care plans. The development of the Care Planning feature involves using existing functionality familiar to users and integrating it with a distinct area of the software dedicated to the care plan. Our goal is to enhance user experience in firstHOMECARE by increasing usability for creating care plans and expanding the user’s ability to edit patient `information amidst this process.
Care Planning has been grouped into multiple release updates as we work towards fully incorporating this new feature within firstHOMECARE. The first Care Planning release (in the 17.2.3 release) included enhanced OASIS assessments as well as controls that provide agencies with a way to specify documents that are available for users.
A Document Exclusion area is now available in Reference Files to provide agencies with the ability to control which documents are available for users. This allows agencies to eliminate unnecessary documents from being included in the document list. For instance, if there are no patients that require occupational therapy then you can choose to exclude OT documents from the list of available documents.
Documents enabled from the Document Exclusion Editor screen will display in the Select a Document drop-down menu for the corresponding office (in Patients | Documents). Only users with access to Reference Files will be able to setup a document list.
Learn more about the Document Exclusion Editor and how to setup a document list.
In preparation for the upcoming releases of Care Planning functionality, new OASIS documents have been implemented within Patients | Documents. These enhanced documents will replace versions of the documents that are currently used. New documents will include an additional feature as well as revised format for interactive forms, which will decrease the amount of time clinicians spend entering information.
In summary, the enhanced OASIS documents include the following specifications:
● Documents include more detail to eliminate the need for clinicians to use multiple documents for a single patient assessment. Although, other standalone documents will be available for use if they are needed (e.g. Braden Risk Assessment Scale, MAHC 10 Fall Risk Assessment).
● Revised interactive forms reduce the amount of time users spend completing documents.
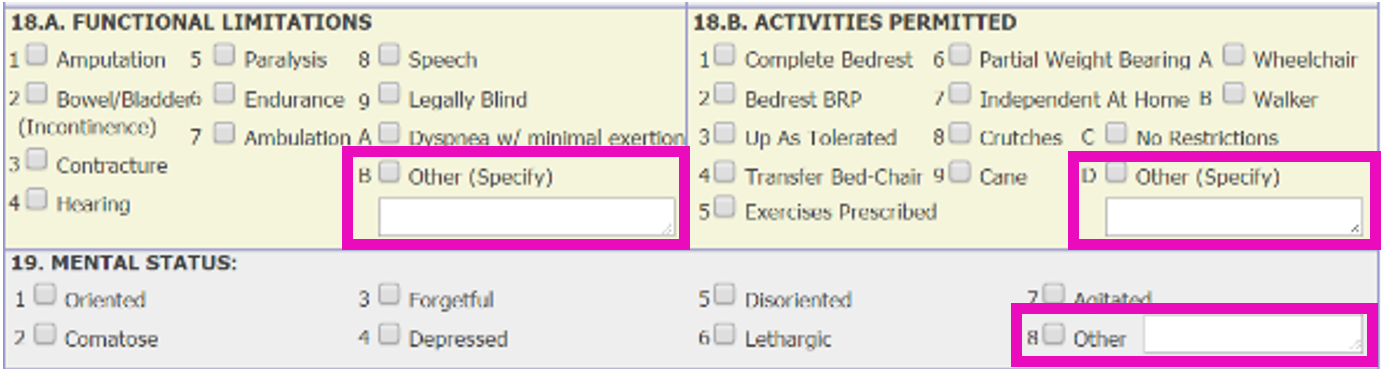
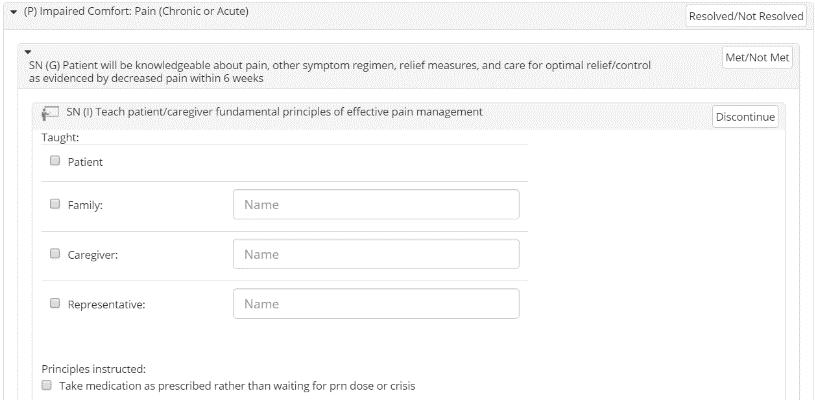
● Drop-down fields replaced with checkboxes or radio buttons to decrease the number of clicks necessary for entering patient information (as seen in sample image).
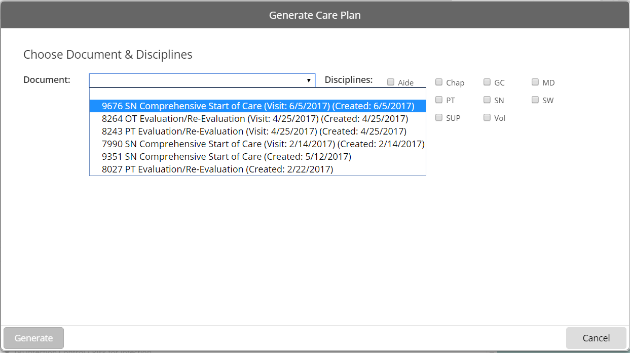
● New Actions feature allows users to utilize only sections that are necessary (if applicable).
● To eliminate the need for users to manually calculate and enter data, totals are automatically calculated for the following assessment tools (based on selections made):
o BMI
o Braden Risk Assessment Scale
o Nutritional Risk Assessment
o MAHC 10 Fall Risk Assessment
● Synchronization with the 485:
o Data required for the 485 will automatically synchronize with the 485 Plan of Care.
o Users no longer have to create a 485 document and then re-enter patient data, or enter data separate from the document.
o If a user creates a “Homecare Certification (485)” document, the software uses data from the comprehensive assessment (e.g. SOC/ROC) to populate fields in the 485. For instance, a diagnosis entered in the assessment will synchronize to “13. ICD CODE / OTHER DIAGNOSIS / DATE“ while safety measures will synchronize to “15. SAFETY MEASURES“.
Documents that are enabled in Reference Files | Document Exclusion will display in the Select a Document menu (in Patients | Documents) in numeric and then alphabetical order.
Listed below are the specific names of the enhanced OASIS documents that are available for each discipline (if enabled in the Document Exclusion Editor ):
● SN
o SN Comprehensive Start of Care
o SN Comprehensive Resumption of Care
o SN Comprehensive Follow-up
o SN Comprehensive Recertification
o SN Comprehensive Discharge
o SN Evaluation/Re-Evaluation
o SN Routine Visit
● PT
o PT Comprehensive Start of Care
o PT Comprehensive Resumption of Care
o PT Comprehensive Follow-up
o PT Comprehensive Recertification
o PT Comprehensive Discharge
o PT Evaluation/Re-Evaluation
o PT Routine Visit
● OT
o OT Comprehensive Start of Care
o OT Comprehensive Resumption of Care
o OT Comprehensive Follow-up
o OT Comprehensive Recertification
o OT Comprehensive Discharge
o OT Evaluation/Re-Evaluation
o OT Routine Visit
● ST
o ST Comprehensive Start of Care
o ST Comprehensive Resumption of Care
o ST Comprehensive Follow-up
o ST Evaluation/Re-Evaluation
o ST Routine Visit
● General Application
o Transfer OASIS
o Braden Risk Assessment Scale
o MAHC 10 Fall Risk Assessment
|
![]() The regular description is used for each document that displays in the Select a Document menu. To ensure the correct version of a document is listed, users can view the long description (as listed in the Document Exclusion Editor ) by hovering the mouse cursor over the document. For the exact names of the enhanced OASIS documents, refer to step 5 in the instructions for setting up a document list. |
As part of the first Care Planning release, an Actions field() is located throughout the new OASIS documents (where applicable). Clinicians can use the Actions field to specify sections of the document that are necessary for the patient assessment (e.g. Ankle motions, balance functional ability, musculoskeletal details, etc.). Additionally, the Actions field will be used with future Care Planning functionality. Every instance of the Actions field is located in the section header throughout the document. As seen in the sample image, the options available in the Actions drop-down menu are unique to each section.
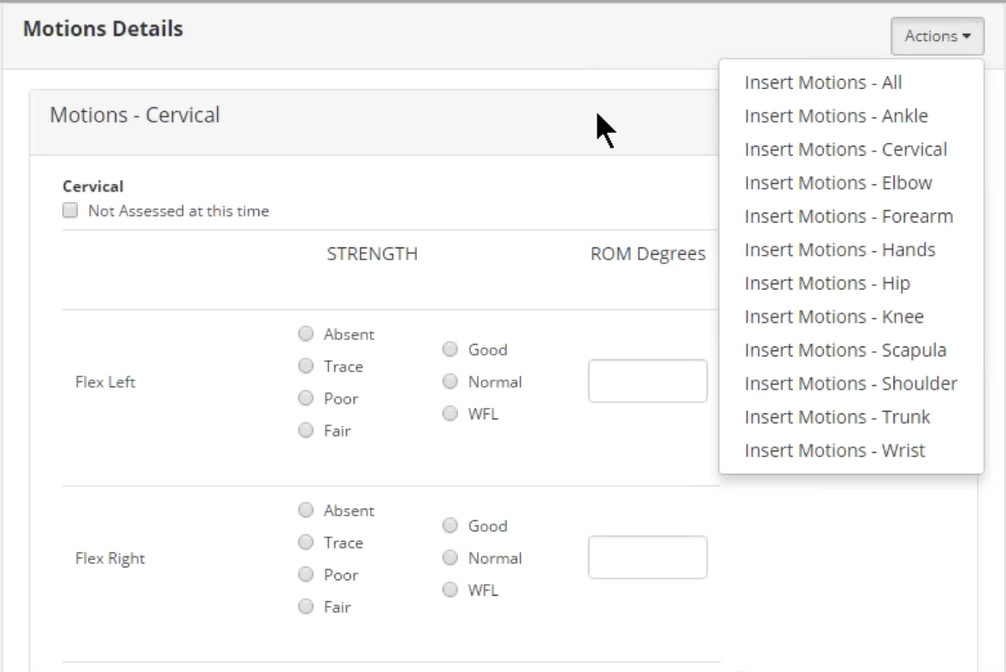
Any applicable sections of the document will appear blank and the Actions field will display to the far right in the header, as seen in the sample image. Users can click Actions and then select the category. After entering all appropriate data for the category, repeat this process as needed.
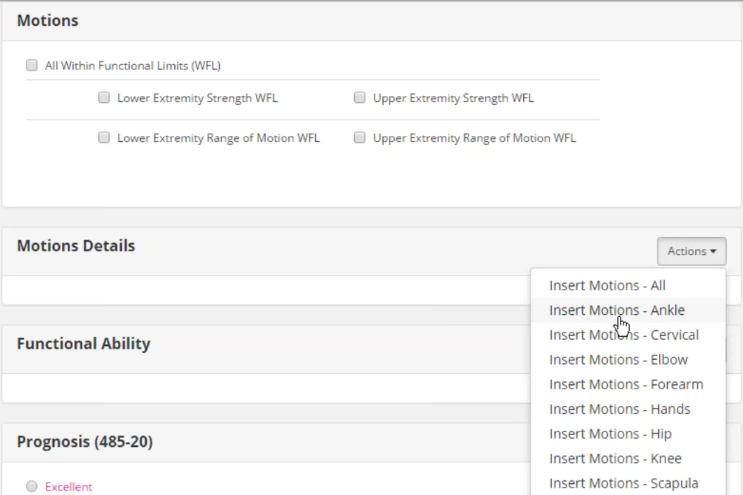
You can also choose to add “All” of the available sections, but this should only be done if the entire section needs to be documented for the patient — as it will result in longer loading times.
If you have added a section and realize that it is not needed, you can remove it by using the same Actions feature.
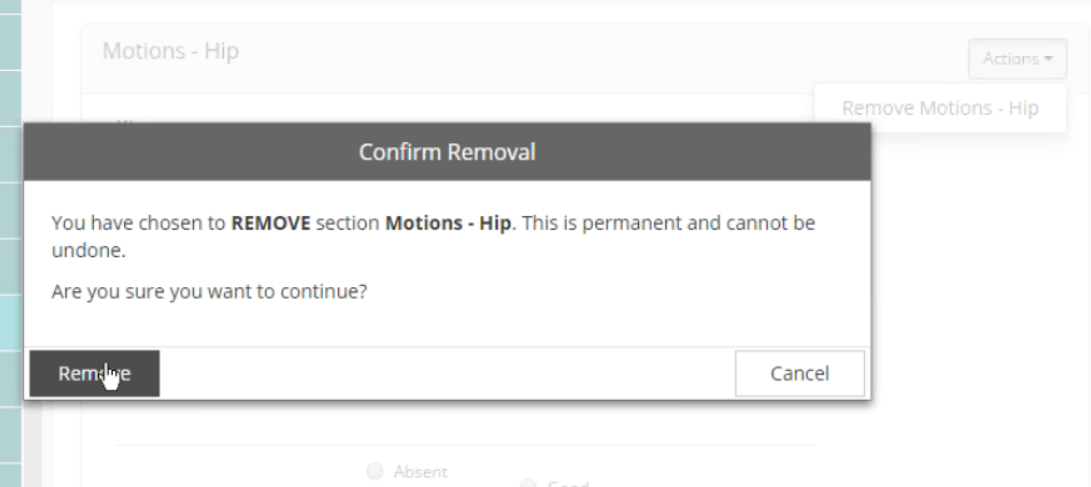
To remove the section, click the Actions icon that’s in the corresponding header for the specific section you want to delete and then select the Remove option (e.g. Remove Motions - Hip ). The remove option is labeled according to the section it's located in.
After the confirmation prompt displays, click Remove.
The Actions feature can also be used to edit information in the patient chart from within the document (when applicable). The Actions menu is available in any section header that has dataflow established between the patient chart and the document (e.g. Medications, Primary Diagnosis, Advance Directives, Health Screening, DME, etc.).
For applicable sections, the Actions menu is located to the far right in the header. Available menu options correlate with the section. For instance, the Actions menu in the Allergies section only allows users to edit patient chart information located in Patients | Intake / Referral | Allergies while the Actions menu at the very beginning of the Start of Care assessment allows users to edit several areas in the patient chart.
By selecting an option in the Actions menu, a smaller window will display with the corresponding screen of the software. For instance, selecting “Edit Patient Admission” allows users to edit information in Patients | Admission / Discharge | Admission and selecting “Edit Patient Demographics” allows users to edit located in Patients | Intake / Referral | Demographics.
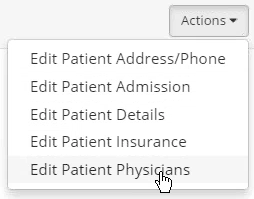
The sample image shows a scenario where the user selected “Edit Patient Physicians” from the first Actions menu available in the comprehensive document. As a result, the Edit Patient Physicians window displayed in front of the document, which is a duplicate of the screen located in Patients | Intake / Referral | Physicians.
Though previous versions of the OASIS documents already contain the Print Preview option to the top-right of the screen, users should take note of this feature when choosing to print the enhanced OASIS documents. While the forms were simplified to enhance usability, this has caused the size of the document to increase.
To avoid longer loading times and unnecessarily large document sizes, users should only print documents with sections that contain patient data. Please note the differences between the two print preview options:
● All Questions/Answers — The printed document will display the maximum number of sections that are available for the corresponding OASIS document.
● Questions with Answers — Even if the option to add “all” available sections was selected in anywhere throughout the assessment (as mentioned on previous page), the printed document will only display sections of the document that actually contain patient data.
In the Patients area of firstHOMECARE (after selecting the desired patient), click the Care Plan tab to access the active care plan for the corresponding patient. This screen is designed to match the format used in OASIS assessments. Although, users are able to create a care plan even if the document is a non-OASIS assessment as care plans are tied to the comprehensive OASIS assessments as well as the Evaluation documents. As seen in the sample image, any Problems, Goals, or Interventions (P/G/I) added to the patient's care plan will display in the primary window (categorized according to the associated Problems and Goals). If there are no care plan elements present, a "Care Plan is empty" message will display.
|
![]() Users can easily transition between the document and the Care Plan tab. Unlike other tabs (e.g. Relationships, Orders ), the Selected Assessment tab (current document) will not go away if you navigate to the Care Plan. You can easily return to the document by clicking the Selected Assessment tab. |
The panel on the right side of the Care Plan screen contains two sections: a Details section and an Add section for adding P/G/I to the care plan. Refer to “Interacting with Care Plan Elements” on the next page to learn more about using these controls. In the Details section, the Long Description (i.e. the entire verbiage) displays for the selected care plan element. Selected care plan elements are highlighted in pink.
More importantly, this section is used to complete P/G/I items and remove them from the care plan. These prompts are used to Discontinue an Intervention, mark a Problem as Resolved, or indicate if a Goal has been Met or not. When a care plan element is selected, users can click to open a unique “Details” prompt for the selected P/G/I.
As seen in the sample images, each prompt differs and is based on the type of care plan element selected (i.e. Problem, Goal, Intervention). Additionally, the type of information and the interactive fields included in the prompt depends on the specific P/G/I that is selected (e.g. “Vital Signs and Assessments”).
|
Users are able to complete all of these actions from within the document. |
In the Care Plan tab, the Add section in the panel on the right side of the screen is used to add Problems, Goals, and Interventions to the care plan; the Details section (described in previous section) is used to edit existing P/G/I. Though the Care Plan tab is used to view or interact with a patient’s active care plan, users can also utilize features available in this screen directly from within any CAREpliance document. The CAREpliance feature is designed to simplify the process of creating, editing, or managing patient care plans.
A simple hierarchy of care plan elements is used in the construction of all patient care plans. For a care plan to be necessary, the patient must first have a Problem to resolve. A Goal is set to be met. Interventions are to help meet a Goal or resolve a Problem. Within each care plan: Interventions are completed or Discontinued, Goals are Met/Not Met, and Problems are Resolved/Not Resolved.
The three care plan elements are summarized below (in the order they are added to a care plan):
Problem — Problem that a patient has (based on response entered in the Assessment/Evaluation or added individually in the care plan).
Goal — Goal we want to accomplish to resolve the Problem (if applicable)
Intervention — Individual orders we use to meet Goals and resolve Problems
Users can add Problems, Goals, and Interventions to the care plan using the same method (in the Add section of the panel on the right). When adding P/G/I, users must simply abide by the logic explained above.
Initially, before a care plan is created, the only available option is to add a Problem because a Problem must exist before there can be a Goal or Intervention associated with it. In the sample image, the Problem icon is highlighted and is the only icon available. All available Problems display below the search field. As you continue to build the care plan, the software will recommend care plan elements.
|
The icons that are available (i.e. Problem, Goal, Intervention ) and the list of recommended care plan elements that display correlate with the element that is currently selected. |
Scroll through the list until you find the desired care plan element and then click to add it to the care plan. Enter information for the specific P/G/I item selected (e.g. Start Date ) in the details prompt that displays and then click Save. The care plan element will be associated with the current item you have selected (if applicable). For instance, if you have a Goal selected in the care plan and add an Intervention, the selected Intervention will be associated with that Goal. The scenario in the sample image shows where a Goal “(G)” was added to a Problem “(P)” and then an Intervention “(I)” was added to that Goal.
A list of recommended P/G/I items display in the Add section. This list populates according to the P/G/I currently selected in the care plan (highlighted in pink). Use the search bar (directly under the P/G/I icons) to simplify the process for finding and adding care plan elements. Whether adding a Problem, Goal, or Intervention, users can enter text into the “Search All” field to search from a comprehensive list of the care plan elements available.
One scenario this can be useful is when there is a large number of items displayed in the list. The second image to the right shows how the software narrows down the list of Goals when the user enters the phrase “rest” into the search field.
In another scenario, there may not be any care plan elements recommended for the selected item. This scenario is shown in the first sample image, as “No suggested Interventions exist ” for the selected Goal. If there are no recommended care plan elements, users can click Show All to display all applicable care plan elements (for the selected P/G/I tab) or use the search bar to identify potential items.
If users cannot find a Problem, Goal, or Intervention by searching, they can create a custom care plan element. Users can create custom care plan by using the same search bar mentioned in the previous section.
To create a custom element, first ensure that you have the icon selected for the type of care plan element you want to create (i.e. Problem, Goal, Intervention ). Enter the specific verbiage you want to use for the P/G/I in the search bar and then click to add the custom element to the care plan. Additionally, the custom element will be associated with the item you have selected (if applicable).
Though some elements contain underscores (____) within the verbiage of the item, every Problem, Goal, and Intervention requires users to enter details that are unique for that specific care plan element. Fields that display in these “Details” prompts correlate with the type of care plan element as well as the context of the element itself. Each prompt is different and varieties of different fields are used to enter necessary data (e.g. Text fields, date-selection menus, radio buttons, checkboxes, etc.).
When is clicked, the “Details” prompt will display for the care plan element. Enter all necessary details and then click Save to add the item to the care plan. Similarly, when using this prompt to complete an element (i.e. Resolve a Problem, meet a Goal, complete an Intervention), click
, indicate the appropriate response and then click Save. For instance, users will select “Yes” or “No” to designate if a Goal has been Met and “Yes” or “No” to designate if a Problem has been Resolved.
At any point while viewing the Care Plan tab, users can generate a care plan based on all of the latest assessment data that has been entered in the system for the selected patient. This option accounts for scenarios that require a user to create a care plan for another discipline. For instance, an HH nurse out in the field will typically not generate care plans for other disciplines. Although, some agencies may have nurses complete the Comprehensive Start of Care assessment for a patient and enter all the appropriate information, but later an internal RN (acting as the patient’s case manager) may create an entire plan of care for all disciplines. This feature provides that convenience to do so.
To the top-right of the screen, click and use the Generate Care Plan prompt to select the specific Document for which the Problems, Goals, and Interventions are being generated. Next, use indicate the applicable Disciplines for the items and click Generate. A Suggested Care Plan will display a list of applicable P/G/I. Initially, only the Problems will display, but users can expand (
) or collapse (
) any individual Problem or Goal to view care plan elements that are associated. Additionally, users can use the controls to the top-right of the Generate Care Plan prompt perform an action to all available care plan elements. Users can Select All, Unselect All, Collapse All, or Expand All.
Designate P/G/I items to include in the care plan by checking the corresponding boxes and then entering any necessary information (e.g. Start Date, specifying the discipline, indicate the Intervention Type, etc.). Similar to how some care plan elements contain underscores (____) within the verbiage of the item (in the Care Plan tab), some of the care plan elements in the Generate Care Plan prompt contain “required” fields. For these fields, click required and then enter the appropriate text within the text field that appears.
|
Care plans can also be generated from within CAREpliance documents by using any instance of the Modify Care Plan feature. |
At any time, users have the option to print a list of all Problems, Goals, and Interventions that are included in a patient’s active care plan. While viewing the Care Plan tab for a patient, click to open a .pdf file in a separate browser window that contains all of the active care plan elements. Users can then print this document using a local office printer. The header of each page in the document contains the patient name and patient ID, while the footer of each page in the document contains the patient name, admission date, and the date associated with the printed care plan.
Additional functionality is included in the Print Care Plan feature so that the software will automatically utilize any applied filters when generating a .pdf version of the patient’s active care plan. The printed version of the care plan will display exactly as it is displayed in the Care Plan tab. Refer to the "Filtering Care Plan Elements" section below for more information about applying filters to a patient's active care plan.
The Care Plan also provides users with the ability to display Problems, Goals, and Interventions in a patient’s active care plan according to specific filtering options. To supplement this new feature, the Care Plan tab has been updated to provide users with contextual information about care plan elements (i.e. P/G/I); users can easily determine when P/G/I was added, the associated discipline, and the End date (if applicable). Additionally, users can view information associated with any Interventions that have been performed (i.e. Date, clinician name, discipline, document type).
The Filters menu panel is available on the left side of the Care Plan screen, which can be used to specify the type of care plan elements that display. Users can access this by clicking to the top-left. When users first access the Care Plan tab, the Details and Add menus display by default. Users can filter care plan elements according to an Episode, Date range, or Discipline. If desired, users can check Show Performed to show any Interventions that have been performed.
To apply filters to a patient’s active care plan, simply open the Filters menu and specify how you want care plan elements to display; according to an episode, a date range, and/or discipline(s). As seen in the sample image, users can choose to filter P/G/I according to multiple disciplines (i.e. Aide, Chap, GC, OT, PT, SW, ST, SUP, Vol). After all of the desired filtering criteria is selected, click Apply. The software will only display active care plan elements that falls within the specified criteria. To unapply any selected filters, click Reset and then click Apply.
If the Show Performed box is checked when filters are applied, the software will display any Interventions that were performed in the active care plan. If applicable, a “Performed (x)” section will display under the corresponding Intervention that has been performed, with the “x” indicating the number of times that the Intervention was performed.
To view additional information about performed Interventions, users can click the Performed (x) link. As seen in the sample image, this section expands to display every instance that the corresponding Intervention was performed. Each instance includes the date that the Intervention was completed, the type of visit conducted, and the clinician that completed the task.
CAREpliance in Comprehensive Documents
The CAREpliance feature (for applicable documents) is designed to greatly simplify the process of creating and editing care plans for clinicians and office agency personnel. Aside from the Care Plan tab (detailed in the previous section) that provides direct access to a patient’s care plan, users are able to edit the care plan without ever leaving the assessment document.
Each care plan is centered on the visit date associated with the document and details are synchronized accordingly. Users must enter a Visit Date (in the header of the document) before they are able to view care plan details (as seen in sample image). This ensures that each patient’s care plan will be consistent throughout the agency database for all users and will only include active care plan elements (i.e. Problems, Goals, Interventions).
As part of the 17.6.4 release, the Enter the completed assessment date prompt has been updated, which displays when users create a new comprehensive document. Instead of entering the assessment completed date exclusively, users are now prompted to enter the Visit Date (and visit time), which the software uses to populate the (M0090) Date Assessment Completed field. This update was applied to support any comprehensive documents that contain CAREpliance functionality, as the Visit Date must be entered before users are able to interact with a patient’s care plan from within the document.
Throughout each comprehensive assessment and evaluation, various questions have the potential to trigger Problems, Goals, and/or Interventions (P/G/I) for the patient’s care plan. An interactive “Problems, Goals, and Interventions” section will display underneath application sections of the document. Each instance of the Problems, Goals, and Interventions feature is based on an entire section of the document (e.g. Clinical Record Items , Neuro/Emotional/Behavior, Medications ) instead of being presented for an individual question (e.g. M1030 Therapies the patient receives at home, M1860 Ambulation/Locomotion ). This consolidation increases usability, allows for an easier workflow, and reduces the overall amount of time that it takes for users to complete CAREpliance documents.
Furthermore, users have the freedom to determine which approach they want to take when completing assessments and interacting with care plan data:
Proceed through the entire document and, in each instance of the interactive Problems, Goals, and Interventions section, use the “View Recommended Problems” option to select the appropriate care plan elements. Repeat this process until document is complete.
Select only care plan elements that are needed for the current visit. For instance, in some situations, the clinician may arrive at the patient’s home and they are unable to stay. This allows them to complete only the necessary tasks (e.g. Taking vital signs, treating wounds, etc.)
Proceed through the entire document and only answer assessment questions. After all assessment information is entered, either use the “Modify Care Plan” option in any of the interactive sections (or click on the Care Plan tab) to construct and generate a care plan for the entire visit.
Interactive functionality will become disabled for documents that are completed, locked, and signed and the Actions features will be removed. Additionally, users will not be able to use any of the Problems, Goals, and Interventions sections. If they attempt to, a notification will display in red. If the document is unlocked, users can still edit the care plan from within the document.
To ensure the latest information is used, the software refreshes data every time any user opens a document. If a user completes a document (but does not lock it) and then a different user opens it later and adds new information, it will be included with the rest of the assessment data. As long as the document is not opened, the information in the document will remain as is.
Editing the Care Plan from Within Documents
The primary functionality that enables users to build a care plan from within the document is the Problems, Goals, and Interventions feature, which is located beneath any section of the assessment where a Problem, Goal, or Intervention applies. Every instance of this section is tied to the Visit Date field (in the document header). When a Visit Date is entered, these sections are enabled.
Any applicable Problems, Goals, or Interventions (P/G/I) will automatically display within the corresponding instance of the interactive Problems, Goals, and Interventions section (e.g. Clinical Record Items , Neuro/Emotional/Behavior, Medications ), based on the assessment data that is entered.
Users can directly interact with P/G/I items displayed in any instance of the Problems, Goals, and Interventions section. Each care plan element is marked according to the type of item; “(P)” for Problems, “(G)” for Goals, and “(I)” for Interventions. If applicable, care plan elements are also labeled according to the discipline that is associated.
As seen in the sample image, once a user clicks “SN (I) Teach patient/caregiver fundamental principles of effective pain management”, the Intervention expands to display additional fields that are specific to the Intervention. Each care plan element is different and contains functionality that is unique to that element. After all applicable information has been entered for a care plan element, a green checkmark will display to indicate that the item has been completed in the visit.
As described in the “Hierarchy of Care Plan Elements” part that is located within the "Care Plan Screen" section above, within each care plan: Interventions are completed or Discontinued, Goals are Met/Not Met, and Problems are Resolved/Not Resolved. This same concept is applied to the actions that users can perform on care plan elements in the Problems, Goals, and Interventions section:
— Initiates the Problem Details prompt, which allows users to indicate if the corresponding Problem has been resolved or not.
— Initiates the Goal Details prompt, which allows users to indicate if the corresponding Goal has been met or not.
— Initiates the Intervention Details prompt for the corresponding Intervention, which allows users to indicate an End Date and discontinue the Intervention.
|
These prompts are the same "Details" prompts described in the "Entering Details for P/G/I" part that is located within the "Care Plan Screen" section above. |
— Indicates that a completed Intervention has not been performed and also reverses any data that has been saved for the corresponding task. This button will only display for an Intervention that has been completed in the patient visit (and the green checkmark displays). When a user clicks Not Performed, the Unperform Intervention Confirmation prompt displays. After the user clicks Unperform to confirm, any existing data for the corresponding Intervention will be deleted.
Within any instance of the Problems, Goals, and Interventions section, users can click View Recommended Problems to display a Generate Care Plan window that lists applicable P/G/I available for adding to the patient care plan, based on assessment data. Each instance of this feature will only list P/G/I items in the Suggested Care Plan that are related to specific section where the View Recommended Problems button is located in the document. Similar with other applications of P/G/I throughout the CAREpliance features, care plan elements are grouped accordingly.
Initially, only the Problems will display, but users can expand () or collapse (
) any individual Problem or Goal to view care plan elements that are associated. Additionally, users can use the controls to the top-right of the Generate Care Plan prompt perform an action to all available care plan elements. Users can Select All available care plan elements, Unselect All, Collapse All, or Expand All P/G/I items that are available.
Designate P/G/I items to include in the care plan by checking the corresponding boxes and then entering any necessary information (e.g. Start Date, specifying the discipline, indicate the Intervention Type, etc.). Similar to how some care plan elements contain underscores (____) within the verbiage of the item (in the Care Plan tab), some of the care plan elements in the Generate Care Plan prompt contain “required” fields. For these fields, click required and then enter the appropriate text within the text field that appears.
Each instance of the Problems, Goals, and Interventions section also provides users with a direct way to edit the current list of P/G/I included in the patient’s current, active care plan. Users can click Modify Care Plan to display the Care Plan window, which contains the same exact layout and functionality that is included in the Care Plan tab. This feature provides users with the convenience of altering the patient’s current care plan from within a document so they will not have to alternate back and forth between the document and the Care Plan tab.
For more information about functionality contained in the Care Plan window, learn about functionality contained in the Care Plan tab by referring to information that is detailed in the "Care Plan Screen" section above. While these details focus on the features in reference to the Care Plan tab, the Care Plan window accessed from within documents contains identical features.
|
At any point while completing a document, users can click Generate Care Plan to generate a care plan based on the latest assessment data that has been entered. |
The Homecare Certification (485) and Homecare Recertification (485) documents will automatically synchronize required data that is entered in CAREpliance documents. This ensures that the 485 Plan of Care is also being built when users are creating a care plan using the CAREpliance features. If a user creates a Homecare Certification (485), the software will use data from the assessment (e.g. “SN Comprehensive Start of Care”) to populate fields in the 485.
Dataflow is established between the 485 and several sections throughout the comprehensive documents, such as Safety Measures, Nutrition Requirements, Functional Limitations, Activities Permitted, Mental Status, and Prognosis. The software will automatically populate any information entered in these sections of the document into the corresponding fields of the associated 485. This eliminates the need for users to enter certain details in multiple places.
If there is not a 1-1 correlation for any data (between the comprehensive assessment and the corresponding 485), this information will populate in the appropriate fields that have been added to the 485 documents.
In addition to synchronization functionality, two supplemental text fields have been added to the 485 documents that are focused on care plan information. A secondary “B” field has been added after each of the following sections of the 485: 21. ORDERS FOR DISCIPLINE AND TREATMENTS and 22. GOALS/REHABILITATION POTENTIAL/DISCHARGE PLANS.
These additional text fields contain care plan details that are relevant to the prior section, such as specific treatments that are scheduled or goals outlined in a patient’s care plan. These new sections in the 485 document include the following specifications:
● 21.B. CARE PLAN ORDERS FOR DISCIPLINE AND TREATMENTS
o Lists all of the Interventions that are currently active in the care plan.
o Interventions are grouped according to the discipline and then in alphabetical order.
o This text field is read-only and is not editable. If users want to change Interventions included in the care plan, they must use the CAREpliance features in the corresponding assessment document or in the Care Plan tab (for the corresponding patient). This ensures that all users are working within the patient’s active care plan.
● 22.B. CARE PLAN GOALS
o Lists all of the Goals that are currently active in the care plan.
o Goals are grouped according to the discipline and then in alphabetical order.
o This text field is read-only and is not editable. If users want to change patient Goals, they must use the CAREpliance features in the corresponding assessment document or in the Care Plan tab (for the corresponding patient). This ensures that all users are working within the patient’s active care plan.