Active care plans for patients are stored in the Care Plan tab within the Patients area of the software After selecting a patient, click the Care Plan tab to access this screen. Though CAREpliance-compatible documents allow users to manage care plans from within documents, this screen provides a direct location for users to view and/or edit the patient’s current care plan.
Users can easily transition between the document and the Care Plantab. Unlike other tabs (e.g.Relationships,Orders), theSelected Assessmenttab (current document) will not go away if you navigate to theCare Plan. Click theSelected Assessmenttab to easily return to the document.
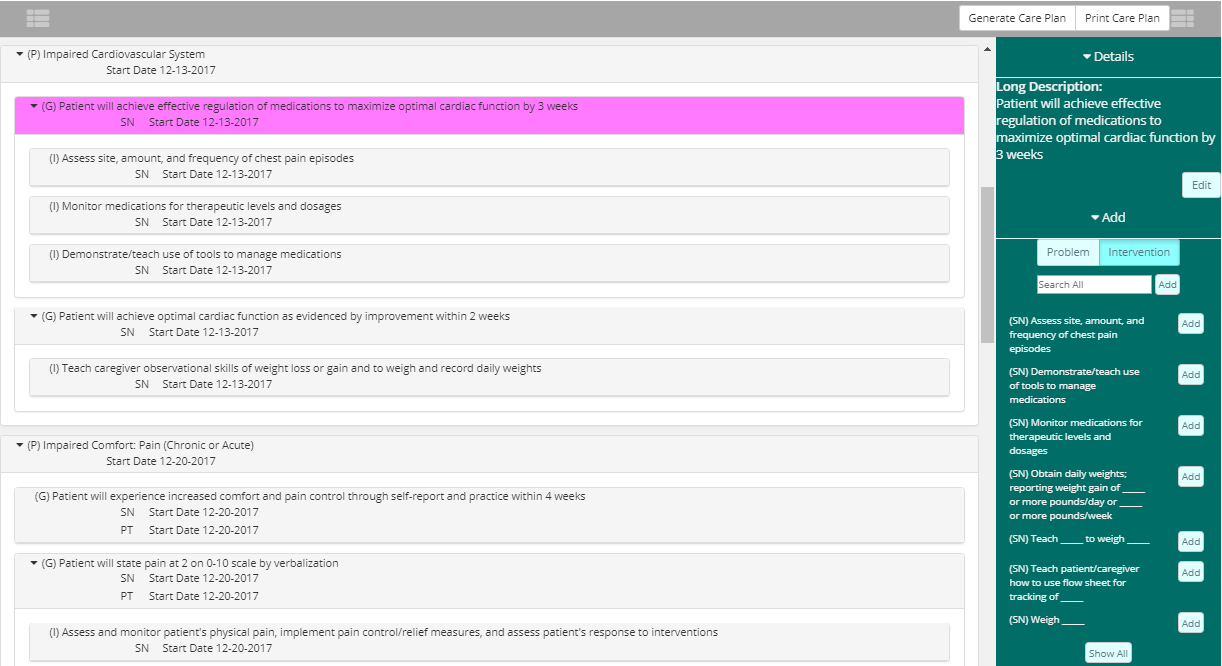
Any Problems, Goals, or Interventions (PGI) currently active in the care plan will display in the primary window (categorized according to the associated Problems and Goals). If there are no care plan elements present (i.e. Problems, Goals Interventions), a “Care Plan is empty” message will display.
Using the toggle feature, simply click or to perform the corresponding action. Though this option is merely a user preference, it may allow users to more easily view different items present in the care plan. As this field is designed a toggle feature, it will either display as “Expand All” or “Collapse All”, depending on the last option that was selected.
The panel to the right contains two sections: a Details section and an Add section (for adding Problems, Goals, and Interventions (PGI) to the care plan). Refer to the following “Interacting with Care Plan Elements” section to learn more about using these controls. In the Details section, the Long Description (i.e. Entire verbiage of PGI) displays for the selected care plan element. As seen in the image above, selected care plan elements are highlighted in pink.
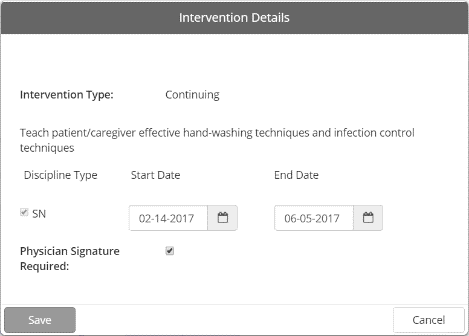
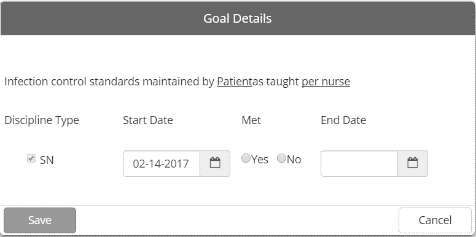
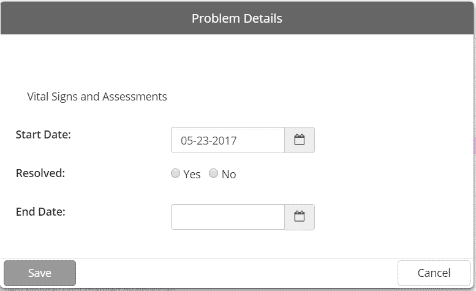
More importantly, this section is used to complete PGI items and remove them from the care plan. These prompts can be used to Discontinue an Intervention, mark a Problem as Resolved, or indicate if a Goal has been Met or not. When a care plan element is selected, users can click to open a unique “Details” prompt for the selected PGI.
As seen in the sample images, each prompt differs and is based on the type of care plan element selected (i.e. Problem, Goal, Intervention). Additionally, the type of information and the interactive fields included in the prompt depends on the specific PGI that is selected (e.g. “Vital Signs and Assessments”).
Users can complete all of these actions from within the document.
In the Care Plan tab, the Add section in the panel on the right side of the screen is used to add Problems, Goals, and Interventions to the care plan; the Details section (described in the section above) is used to edit existing PGI.
Though the Care Plan tab is used to view or interact with a patient’s active care plan, users can also utilize features available in this screen directly from within any CAREpliance document. The CAREpliance feature is designed to simplify the process of creating, editing, or managing patient care plans.
Hierarchy of Care Plan Elements
A simple hierarchy of care plan elements is used in the construction of all patient care plans. For a care plan to be necessary, the patient must first have a Problem to resolve. A Goal is set to be met. Interventions are to help meet a Goal or resolve a Problem. Within each care plan: Interventions are completed or Discontinued, Goals are Met/Not Met, and Problems are Resolved/Not Resolved.
The three care plan elements are summarized below (in the order they are added to a care plan):
●Problem — Problem that a patient has (based on responses entered CAREpliance documents or added individually to the care plan).
●Goal — Goal we want to accomplish to resolve the Problem (if applicable)
●Intervention — Individual orders we use to meet Goals and resolve Problems
Adding Care Plan Elements
Users can add Problems, Goals, and Interventions to the care plan using the same method (in the Add section of the panel on the right). When adding PGI, users must simply abide by the logic explained above.
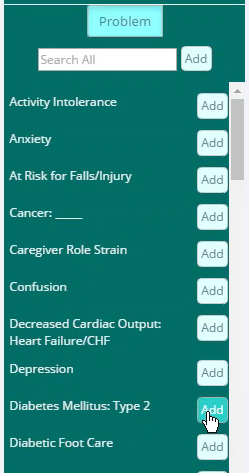
Initially, before a care plan is created, the only available option is to add a Problem because a Problem must exist before there can be a Goal or Intervention associated with it. In the sample image, Problem icon is highlighted and is the only icon available. All available Problems display below the search field. As you continue to build the care plan, the software will recommend care plan elements.
The icons that are available (i.e. Problem, Goal, Intervention) and the list of recommended care plan elements that display correlate with the element that is currently selected.
Scroll through the list until you find the desired care plan element and then clickto add it to the care plan. Enter information for the specific PGI item selected (e.g. Start Date ) in the details prompt that displays and then click Save. The care plan element will be associated with the current item you have selected (if applicable).
For instance, if you have a Goal selected in the care plan and add an Intervention, the selected Intervention will be associated with that Goal. The sample image below a scenario where a Goal “(G)” was added to a Problem “(P)” and then an Intervention “(I)” was added to that Goal.
Searching for Care Plan Elements
A list of recommended PGI items display in the Add section. This list populates according to the PGI currently selected in the care plan (highlighted in pink). Use the search bar (directly under the PGI icons) to simplify the process for finding and adding care plan elements. Whether adding a Problem, Goal, or Intervention, users can enter text into the “Search All” field to search from a comprehensive list of the care plan elements available.
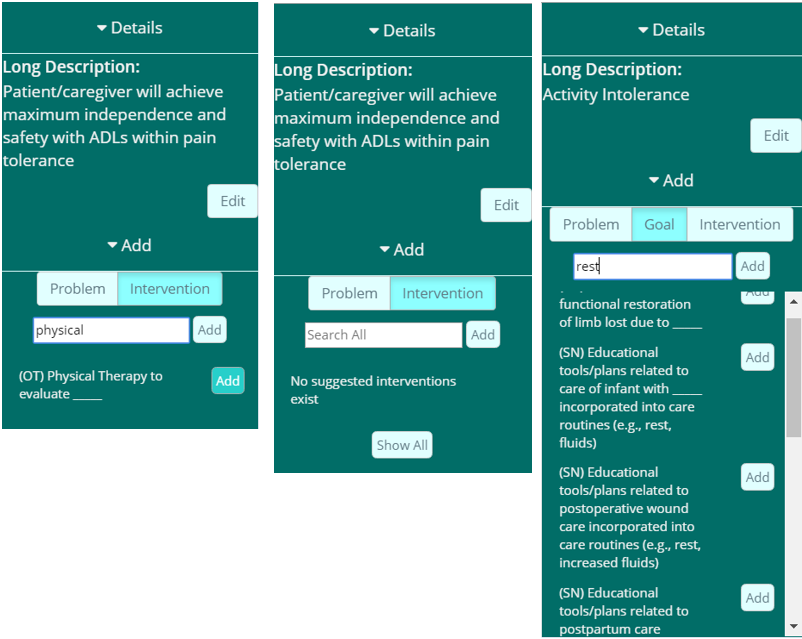
One scenario this can be useful is when there is a large number of items displayed in the list. The third sample image shows how the software narrows down the list of Goals when the user enters the phrase “rest” into the search field.
In another scenario, there may not be any care plan elements recommended for the selected item. This scenario is highlighted in the second image, as “No suggested Interventions exist ” for the selected Goal. If there are no recommended care plan elements, users can click Show All to display all applicable care plan elements (for the selected PGI tab) or use the search bar to identify potential items (third image).
Creating Custom P/G/I
If users cannot find a Problem, Goal, or Intervention by searching, a custom care plan element can be created. Users can create custom care plan by using the same search bar mentioned in the previous section.
To create a custom element, first ensure that you have the icon selected for the type of PGI (Problem, Goal, Intervention ). Enter the specific verbiage you want to use for the PGI in the search bar and then click to add the custom element to the care plan. Additionally, the custom care plan element will be associated with the item that is currently selected (if applicable).
Previewing Interventions with Custom Forms
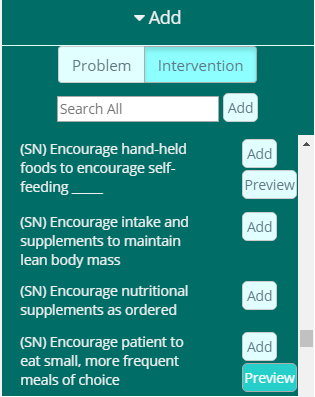
In the Add panel, users are able to preview Interventions that contain custom forms before adding them to the care plan. As seen in the sample image, users can identify applicable Interventions using the Add panel search feature in the Care Plan screen. Users can preview any Intervention in the list of search results that contains aoption underneath the action button.
When a user clicks , a separate browser window opens to display a sample form for the selected Intervention. As seen in the sample image, the assessment form for the (SN) Encourage patient to eat small, more frequent meals of choice Intervention displays exactly as it would display within the document.
Entering Details for P/G/I
Though some elements contain underscores (____) within the verbiage of the item, every Problem, Goal, and Intervention requires users to enter details that are unique for that specific care plan element. Fields that display in these “Details” prompts correlate with the type of care plan element as well as the context of the element itself. Each prompt is different and varieties of different fields are used to enter necessary data (e.g. Text fields, date-selection menus, radio buttons, checkboxes, etc.).
When is clicked, the “Details” prompt will display for the care plan element. Enter all necessary details and then click Save to add the item to the care plan. Similarly, when using this prompt to complete an element (i.e. Resolve a Problem, meet a Goal, complete an Intervention), click , indicate the appropriate response and then click Save. For instance, users will select “Yes” or “No” to designate if a Goal has been Met and “Yes” or “No” to designate if a Problem has been Resolved.
Editing the End Date for P/G/I
When users enter an End Date in the “Details” prompt to complete PGI (e.g. Indicate Problem as Resolved, Goal as Met, or Intervention as completed), they must then click Yes in the Save Confirmation prompt that displays. This prompt notifies the user that the End Date will be applied to PGI associated with the item and all PGI affected will be removed from the care plan according to the End Date that was specified.
Users can remove the End Date from PGI by selecting a care plan element and clicking to reopen the “Details” prompt. If applicable, select the radio button to unselect the specified action (i.e. Resolved field for Problems and Met field for Goals). Remove the End Date and then click Save to confirm the action. Repeat this for any other PGI that the End Date was applied to.
Users cannot remove the End Date if an Intervention has been included in a physician order (or a discontinued order) and the corresponding 485 has been locked.
In this scenario, users must add a new instance of the Intervention with a Start Date that is 1 day after the previous End Date.
While viewing the Care Plan screen, users can view specific Problems, Goals, and Interventions (PGI) in the current care plan by selecting the desired filtering options. To supplement this feature, users are also able to view contextual information about care plan elements.
Users can easily determine when PGI was added, the associated discipline, and the End date (if applicable). Additionally, users can view information associated with any Interventions that have been performed (i.e. Date, clinician name, discipline, document type).
Filtering Active Care Plan Elements
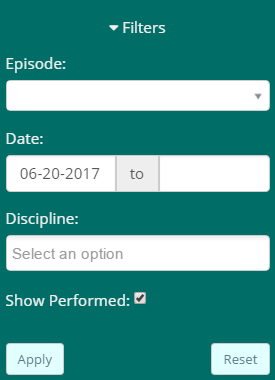
A Filters menu panel is available on the left side of the Care Plan screen, which can be used to specify care plan elements that display. Users can access this by clicking to the top-left. When users first access the Care Plan tab, the Details and Add menus display by default. As seen in the sample image, users can filter care plan elements according to an Episode, Date range, or Discipline. If desired, users can check Show Performed to show any Interventions that have been performed.
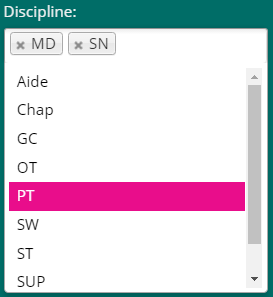
To apply filters to a patient’s active care plan, simply open the Filters menu and specify how you want care plan elements to display: according to an episode, a date range, and/or discipline(s). As seen in the sample image, users can choose to filter PGI according to multiple disciplines (i.e. Aide, Chap, GC, OT, PT, SW, ST, SUP, Vol). After all of the desired filtering criteria is selected, click Apply.
The software will only display active care plan elements that falls within the specified criteria. To unapply any selected filters, click Reset and then click Apply.
Viewing Performed Interventions
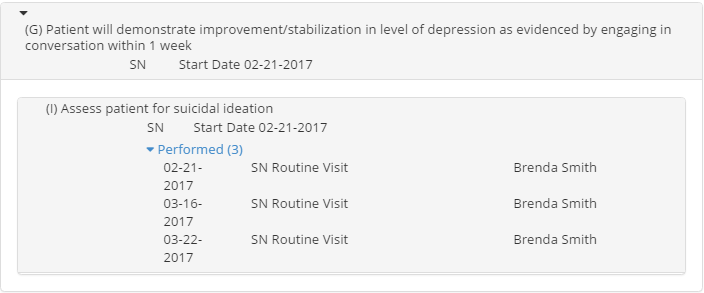
If the Show Performed box is checked when filters are applied, the software will display any Interventions that were performed in the active care plan. If applicable, a “Performed (x)” section will display under the corresponding Intervention that has been performed, with the “x” indicating the number of times that the Intervention was performed.
To view additional information about Interventions that have been performed, users can click the Performed (x) link that is available. As seen in the sample image, this section expands to display every instance that the corresponding Intervention was performed. Each instance includes the date that the Intervention was completed, the type of visit conducted, and the clinician who completed the task.
Printing the Care Plan with Active Filters
To supplement the filtering feature in the Care Plan screen, the Print Care Plan functionality has been designed so that the software will retain any filters that are currently applied when generating a .pdf version of the patient’s active care plan.
The printed version of the care plan will display exactly as it is displayed in the Care Plan tab.
At any point while viewing the Care Plan tab, users can generate a care plan based on all of the latest assessment data that has been entered in the system for the selected patient. This option accounts for scenarios that require a user to create a care plan for another discipline. For instance, an HH nurse out in the field will not typically generate care plans for other disciplines. Although, some agencies may have nurses complete the Comprehensive Start of Care for a patient and enter all the appropriate information, but later an internal RN (acting as the patient’s case manager) may create an entire plan of care for all disciplines. This feature provides that convenience to do so.
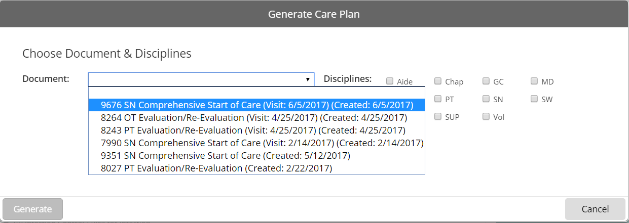
To the top-right of the screen, clickand use the Generate Care Plan prompt to select the specific Document for which the Problems, Goals, and Interventions are being generated. Next, indicate the applicable Disciplines for the items and click Generate. A Suggested Care Plan will display a list of applicable PGI. Initially, only the Problems will display, but users can expand () or collapse () any individual Problem or Goal to view care plan elements that are associated. Additionally, users can use the controls to the top-right of the Generate Care Plan prompt to apply certain commands to all PGI currently in the care plan; users can Select All, Unselect All, Collapse All, or Expand All.
Designate PGI items to include in the care plan by checking the corresponding boxes and then entering any necessary information (e.g. Start Date, specifying the discipline, indicate the Intervention Type, etc.). Similar to how some care plan elements contain underscores (____) within the verbiage of the item (in the Care Plan tab), some of the care plan elements in the Generate Care Plan prompt contain “required” fields. For these fields, click required and then enter the appropriate text within the text field that appears.
Care plans can also be generated from within CAREpliance-compatible documents by using any instance of the Modify Care Planfeature (Refer to "Modify Care Plan" section on pages 30-31).
At any time, users have the option to print a list of all Problems, Goals, and Interventions that are included in a patient’s active care plan. While viewing the Care Plan tab for a patient, click to open a .pdf file in a separate browser window that contains all of the active care plan elements.
Users can then print this document using a local office printer. The header of each page in the document contains the patient name and patient ID, while the footer of each page in the document contains the patient name, admission date, and the date associated with the printed care plan.