Use the Charge Verification tool to verify charges before you create a Billing Batch. If a Discipline code is setup with the "Scheduling Release Process" selected as the Visit Behavior (in Reference Files | Discipline Codes), charges that originate from the P Pageof a document must be approved before they can be billed.
To approve a charge using Charge Verification:
1.From the Main Menu, click Tools then select Charge Verification. Enterprise Edition displays any charges that require approval.
2.If desired, you can use the filtering options to narrow the results that display in the grid.
●Offices— Select which office(s) is used to determine visits that are included in the results.
●Personnel— Display visits that are associated with a specific employee. If this field is left blank, visits for all personnel will be included in the results.
●Patient— Display visits that are associated with a specific patient. If this field is left blank, visits for all patients will be included in the results.
●Date From / Thru— Use theDate FromandThrufilters to only include visits that fall within the specified date range.
3.Select the Approve checkbox next to each charge that you want to approve for billing. Or, click Approve All in theVisitsection at the top of the screen to approve all visits that are displayed in the grid.
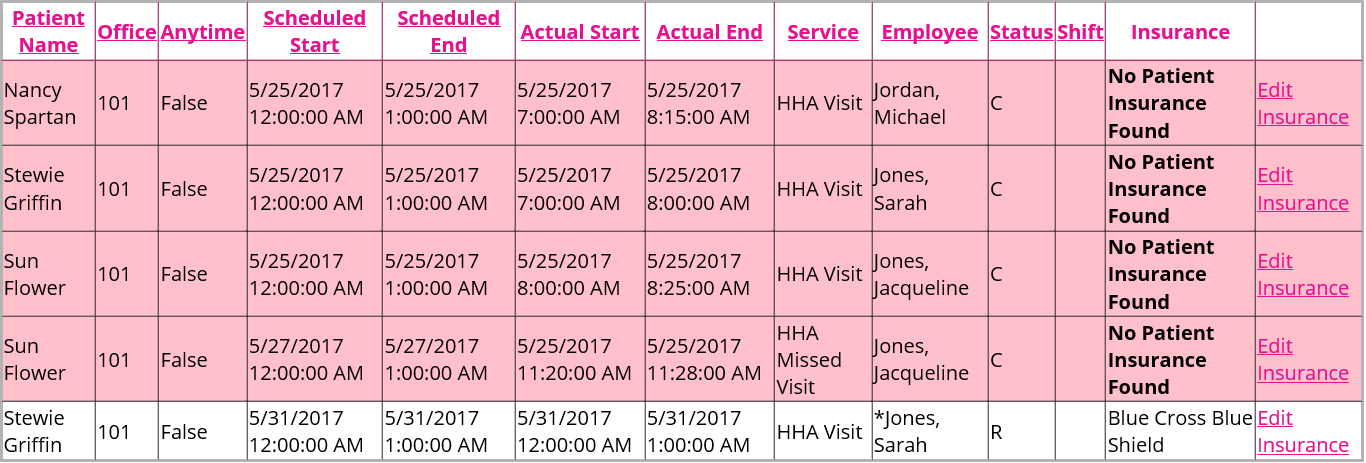
Each charge must have a payor assigned before it can be approved. If a user attempts to approve a charge that does not have a payor assigned, an error message will display in red and the corresponding entry will be an error message will display in red and the entry will be highlighted in pink. If a user attempts to approve a mixture of charges (some with a payor assigned and some without), the charges with a payor assigned will be approved while the ones without will remain in Charge Verification.
If necessary, you can edit the insurance associated with an item in the display grid.
1.Click the Edit Insurance link beside a patient in the schedule.
2.Click the arrow beside the field in the Insurance column, and select the correct payor that should be assigned to the visit.
If you did not set up multiple insurance payors for the patient, only the current insurance payor is available in this field.
3.Click the Update Insurance link.
4.Click . The approved charges are now in Charge Entry and are available for billing.