Once a transfer is completed and billed, the appropriate dollar amount will display in this column and the software will update information in the Payments & Adjustments grid accordingly:
TheEnding Balancecolumn for the primary payor will reflect a new total of "$0.00" and the transferred amount will contain an adjustment type of "Balance Transfer" (in theType Detailcolumn).
If a transfer has been voided, or transferred back, the entry will contain an adjustment type of "Reverse Balance Transfer" (in theType Detailcolumn).
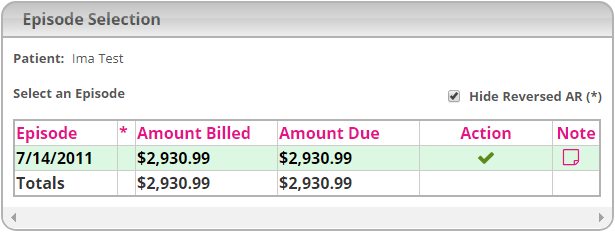
oAction— Displays if action must be taken from the agency or if no action is needed. This column will be blank if there aren't any notes present inAccounts | Account Summary | Notes.(New)
oNote— Contains a icon, which will display theNotestab when clicked (refer to the Entering Account Summary Notes topic for details). The most recent note will display when the user hovers over the note icon with the mouse cursor (if applicable).(New)
The Action and Note columns, as well as the corresponding functionality, have been incorporated with the Episode Selection grid in Accounts | Payments | Post Payments.
Users can use the button (for the Accounts Receivable Reconciliation grid) or the button (for the Accounts Receivable grid) to display the corresponding contact information in the grid header.
Displays the status of a transfer throughout the transfer process. This column will display one of the following statuses (if applicable):
In Process — Indicates that the transfer information has been entered and saved, but theTransferbutton has not been clicked yet. Additionally, this may indicate that a user has clickedTransfer, but the charges have not been batched or billed yet.
True — Indicates that charges for a transfer have been batched or billed.
Partially Billed — Indicates that only a portion of the transferred claim was batched or billed.
After a transfer is completed and billed, the software will update information in the Payments & Adjustments grid accordingly:
●The Ending Balance column for the primary payor will reflect a new total of "$0.00" and the transferred amount will contain an adjustment type of "Balance Transfer" (in the Type Detail column).
●If a transfer has been voided, or transferred back, the entry will contain an adjustment type of "Reverse Balance Transfer" (in the Type Detail column).
Users are able to enter notes that contain details pertaining to the selected patient’s account summary in Accounts | Account Summary | Notes. From the Notes tab, users can enter notes and view a history of previous notes that have been entered for the selected patient. Previous notes that have been entered will display in the Account Notes History grid, which contains the following columns of data:
●Active— Indicates whether or not the note is active or inactive.
●User— The user that entered the note.
●CreatedDate— The date and time that the note was saved.
●Category— Indicates the note category for the selected entry (categories are stored in Reference Files | Acct Note Category).
●Notes— Displays the specific note verbiage that was entered.
●Action— Displays the status that was selected when the note was entered (for "action needed" orfor "action resolved").
●EmailedTo— Displays the most recent user that the note was sent to using the integrated Email feature.
●EmailedFrom— Displays the most recent user that sent the note using the integrated Email feature (including the date and time that the message was sent).
These notes can be displayed in the A/R Aging Reportor, in the more comprehensive,Accounting Notes Report.
To enter a new account summary note for a patient:
1.From the main menu, navigate to Accounts | Account Summary. By default, the Patient Search menu is displayed on the left. If necessary, use thePatient Searchmenu and specify the patient in which to add an account summary note.
2.Select the applicable entries in the Accounts Receivable Reconciliation and Accounts Receivable grid.
3.Click the Notes tab. Ensure the correct patient entry is selected in the Selected A/R Entry grid.
4.In the New Account Note Details section, enter the desired verbiage in the Note text field.
5.If desired, add a narrative to the text field (narratives are managed in Master Files):
●Select (above the Note field) to initiate the Narrative prompt.
●After the Narrative prompt displays, enter any applicable details in the narrative text field.
●Check the box next to Show All Codes to populate a list of narrative options in the drop-down menu.
●Click the drop-down menu and select an applicable narrative from the list of options.
●Select Add Text to add any of the narrative details into the Note text field.
●Repeat these steps for any additional narratives.
6.Check either the box next to Action Needed or Action Resolved to designate a status for the note.
7.Select the most appropriate option from the Note Category drop-down menu. Account note category options are populated from data stored inReference Files | Acct Note Category.
8.Click .
Sending Note to Another User
Furthermore, while on the Notes tab, users can click the Email icon( ) at the top of the screen to send details for the account summary note to another user (if Messaging is enabled in Administration | System Control). The message will utilize the following format:
●By default, the Subject line of the message will display the selected note category (e.g. "Write off").
●The body text of the message will include the following note details:
oPatient Name
oPatient ID
oBatch Date of the line item selected in the Accounts Receivable grid
oStatement From / Thru dates
oNote Category
oVerbiage entered in the Note field.
oLink to the mainAccount Summaryscreen for the corresponding patient (to view all notes entered on the account) will be located at the top-right of the e-mail prompt.
The Notes tab and all of this functionality is also accessible from Accounts | Payments | Notes. Furthermore, the "Notes" and "Action" columns that were added to the Accounts Receivable grid (on the Account Summary screen) have also been implemented within the Episode Selection grid in Accounts | Payments | Post Payments, as shown in the sample image.
 .
. button (for the
  button (for the