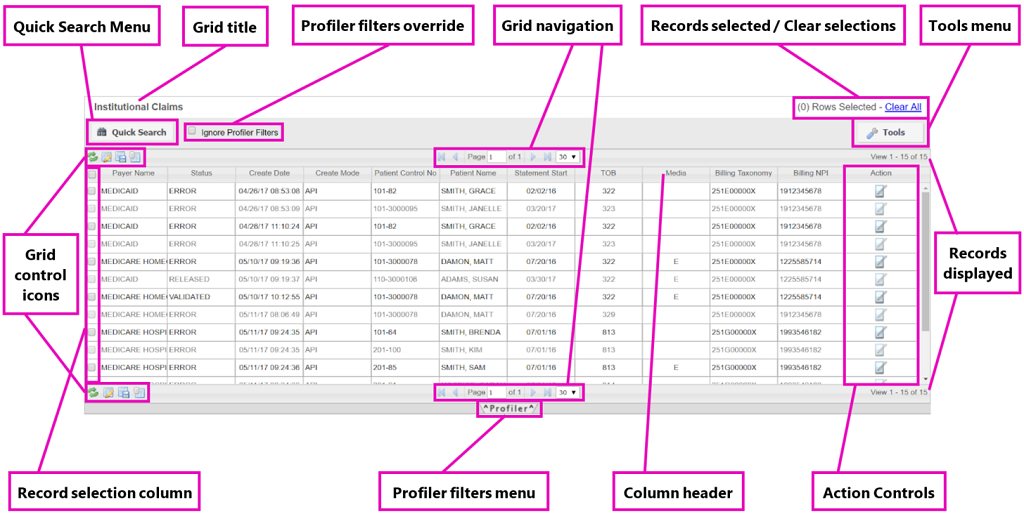
As mentioned, each grid utilizes the same design, but certain control features contain different options (e.g. Quick Search, Tools, Profiler). Highlighted in the diagram below are common components included in the firstREV grid layout.
This section of the guide contains details on general functionality and controls that are present throughout the firstREV display grids. Any screen in firstREV that displays data uses the same type of grid format. Each row in the grid represents a different record and data is broken up into several columns of data. Users have freedom to choose exactly how they want data to display data in each grid. This includes the ability to rearrange columns in the grid, include or exclude specific columns of data, or sort records by a column of data. There are also various other filtering options and search capabilities built into the grid functionality.
All display grids in firstREV function in the same manner, containing only slight differences in certain control options that are available. Variations are based on the specific application of each grid. For instance, the “Tools” menu in the Institutional Claims grid (e.g. Release, Validate) does not contain the same options as the “Tools” menu in the Remit (Payments) grid (e.g. Posted, Deposited).
Grid LayoutAs mentioned, each grid utilizes the same design, but certain control features contain different options (e.g. Quick Search, Tools, Profiler). Highlighted in the diagram below are common components included in the firstREV grid layout.
Click ![]() to expand a search menu with filtering options. The fields available in the Quick Search menu are different for each grid. To search for specific records (i.e. claim or remits), enter specific details you want to search for in the fields provided (i.e. claim or remit) and then click
to expand a search menu with filtering options. The fields available in the Quick Search menu are different for each grid. To search for specific records (i.e. claim or remits), enter specific details you want to search for in the fields provided (i.e. claim or remit) and then click ![]() . Any results that meet the criteria will display in the grid and
. Any results that meet the criteria will display in the grid and ![]() will display at the top of the Quick Search menu to indicate that search filters are currently applied to the grid. Click
will display at the top of the Quick Search menu to indicate that search filters are currently applied to the grid. Click ![]() to remove any applied search criteria and show all available data in the grid.
to remove any applied search criteria and show all available data in the grid.

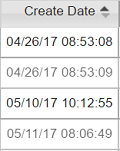
If desired, users can sort records in every grid by a specific type of data. Click any column header to sort records in the grid by that corresponding data. Users can toggle this function to sort records in either an ascending or descending order by clicking the column header again. A darker arrow will display next to the column header label to indicate how data is currently sorted by. As seen in the sample image, the up arrow is darker and records are listed in an ascending order, from top to bottom.

Located above and below the grid data are navigational controls that are used display different pages of data records (if applicable). Use the drop-down menu to the immediate right of the navigational controls to select the maximum number of records that display in each page of results. To the far right of these controls, users can determine the total number of records listed in the grid data as well as the range of records that are currently shown on the screen as seen in the sample image( ).
).
Use  and
and  to move to the previous or next page of the grid, respectively. Additionally, users can display the very first page of results by clicking
  or display the very last page of results by clicking
  . Users also have the option to place their mouse curse in the number field and manually type which page they want to display. For instance (referencing the sample image, above), the user could replace the “2” for an “8”.
To select a record in the grid, check the box in the record selection column (to the far left) for the corresponding row. Users can select multiple rows so they can complete processes more than one item at a time (e.g. editing, validating, or releasing claims). As the number of records included in the grid results can span multiple pages, users may need to determine how many records (“rows”) they currently have selected.
This information displays above the grid, to the far. Additionally, users can click Clear All to uncheck all records they currently have selected.
Every grid in firstREV contains several control icons that are located both above and below the records displayed, to the far left. Each control icon allows the user to perform a unique function with data displayed in the corresponding grid:
●  — Reload Grid to ensure the latest data is displayed in the grid.
●  — Customize Columns that used in the current grid. When clicked, a Select Columns prompt displays and the user can choose which columns of data are shown in the grid by adding or excluding the appropriate columns (e.g. “Import Date”, “Payer Name”) in the Selected section. Drag-and-drop functionality is used to complete this process. Click Save to implement the changes for the current grid.
●  — Save Preferences will automatically cause the current configuration of columns to be saved for the corresponding grid. This includes the specific columns of data included as well as the arrangement of the columns in the display grid.
●  — Export Wizard is used to export grid data into a .pdf or .csv file. Click this icon to initiate the prompt and then specify data included in the file as well as the file format.
Some display grids include a Tools menu, though not every grid in firstREV has one (e.g. Eligibility, Claim Status ). Each instance of the Tools menu contains features that are unique to the screen that it is associated. For example, this instance of the Tools menu is present in both the Institutional Claims and Professional Claims grids and includes actions performed on claims; options available for the Remit (Payment) or Remit (Claims) grids are unique to actions performed on remittances.
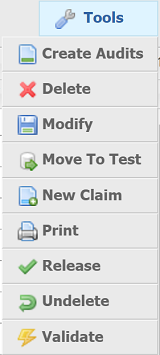
Though users can open individual records and complete these tasks, the Tools menu allows users to select multiple records and complete a task for all of them. Regardless of the task chosen (or the number of records selected), a prompt will always ask the user to confirm that they want to perform the task selected in the Tools menu.
Each display grid in firstREV includes an Action column that displays to the far right (by default). Similar to the Tools menu, the Action column contains command icons that are unique to the application of the grid data. Listed below are the different command icons that can be seen in the Action column throughout firstREV:
● ![]() — Edit
— Edit
● ![]() — Download
— Download
● ![]() — Resubmit
— Resubmit
● ![]() — View
— View
Also available to users is the Profiler, which offers a wide range of filtering options for grid data. Users can access the Profiler by clicking 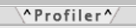 at the bottom of any data grid in firstREV. This advanced filtering and sorting feature allows users to customize information that displays in each screen. For example, if there is more than one office location associated with your agency, you can use this to select which office’s claims display in the Institutional Claims grid. By default, data grids will load claims for all offices that are setup within each database.
Options available in the Profiler are unique to each individual grid and users apply filtering options to each grid separately. The partial screenshot below shows some of the options that are available in the Profiler for the Institutional Claims grid. Settings in each Profiler are separated into two main tabs: Filters and Sorting.
● Filters tab — Includes a variety of different types of filtering options (unique to each grid) that are broken up into different categories (e.g. Dates, Payment Method, Claim Type, Payer ).
● Sorting tab — Allows users to indicate specific columns of data that are automatically sorted in the grid (in ascending or descending order). Even if this is applied to the grid, users can still override this by manually clicking a column header to sort data.

|
|
Any settings that are applied to a grid (whether from the Filters tab or Sorting tab) will remain until they are cleared by the user. |
To apply Profiler settings to a grid:
1. While in screen you want to apply a profile to, click the Profiler tab at the bottom of the grid.
2. Using the Filters and/or Sorting tab, select all of the desired settings you want to apply.
3. If, at any time, you decide not to apply any of the filtering options, click ![]() .
.
4. After making your selections, click ![]() .
.
5. Data in the grid will automatically adjust to fit the criteria that you specified. As seen in the sample image below, the filtering options you selected will display in the Current Settings of the Profiler (underneath the Save button).

|
|
Users can remove filtering or sorting settings currently applied to a grid at any time by opening the Profiler and then clicking |
To apply Profiler settings to a grid:
1. Complete the process for applying Profiler settings to a grid.
2. Click ![]() . A Save Profile prompt will display.
. A Save Profile prompt will display.
3. In the Save As section, choose whether to Save to Existing Profile (if applicable) or choose Create New Profile.
4. If you are creating a new profile, enter the Profile Name you want to use.
5. Click Save.
By default, firstREV will automatically display information in the grids for all office locations. However, you can use the Profiler to select which information is shown in the view.
1. To specify which office(s) firstREV uses to display data in the grid:
2. Click the Profiler tab.
3. Scroll down until you find the Provider section.
4. Check box for Billing Provider ID.
5. Click Choose to display a prompt with a list of all providers listed in your agency’s firstREV account.
6. In the Choose Provider prompt, check the corresponding box for the office(s) you want data to display for.
7. If necessary, you can use the search field below to narrow down the results that display.
8. Once you have selected the desired office(s), click ![]() .
.