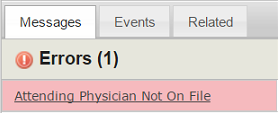
We recommend that users correct claim errors by using the resolution prompt in the Messages tab. The error resolution prompts helps users to edit claims by providing additional context about the source of the error. Additionally, the error resolution prompts organizes allows users to proceed through the editing process and correct each error in an organized, orderly manner.
To access the error resolution prompt, click on any individual error listed in the Messages tab, such as the single error shown in sample image.
For specific information about Messages tab feature that is used to correct errors that are present in claims, refer to the previous section for details about components that are included in the error resolution prompt.
|
|
As explained in the Interacting with Claim Forms topic, users can directly modify or enter data in any field in the claim form. Users have the option to manually edit information in fields associated with errors (in red), but we highly recommended that users follow the process outlined below to correct errors using the error resolution prompt in the Messages tab. |
Outlined below is the general process users can follow for editing claims that contain errors:
1. If necessary, navigate to either Claims | Institutional or Claims | Professional.
2. Find the patient claim that you want to edit. If necessary, use the Quick Search feature.
3. Click ![]() or select anywhere in the corresponding row to open the patient claim.
or select anywhere in the corresponding row to open the patient claim.
4. If necessary, click the Messages tab on the right side of the screen. A list of all errors in the claim will display in the Errors section, with the total number of errors shown in parentheses.
5. Open the error resolution prompt to begin working on the claim errors. To open the error resolution prompt, click on one of the error ‘links’ listed in the Messages tab.
6. The error resolution prompt serves as a sort of 'wizard' interface, which includes additional details and features to help you correct errors. You can fix errors directly within these message prompts.
● Guides you through the error correction process.
● Learn context about the error using the Message section.
● See Related Fields that are associated with the problem and directly change information directly in the fields without exiting the prompt. Fix the incorrect, or missing, information (as necessary) and then click Keep Changes.
● Navigate between each error using the Prev and Next buttons.
|
|
Refer to the "Error Resolution Prompt" section above for detailed information on this feature. |
7. After you have properly addressed all errors, click Close return to the claim screen.
8. Hover the mouse cursor over the Transaction tab and then select Save & Validate.
9. Clean claims that are ready to be released can be manually released (by the appropriate user) from the corresponding claims grid (i.e. Institutional, Professional). While viewing the claims grid, select the validated claim, hover the mouse cursor over the Tools menu, and then select Release.
|
|
Each agency can decide if firstREV releases clean claims automatically (once validated) or if they must be manually released by a user. For each individual user (in Settings | Users), set the Release When Validated By User option to “No” to require users to manually validate and release claims. If this option is set to “Yes”, firstREV will automatically release claims upon import (manually or from EE) if they contain no errors. |