.
.
To validate HIS and P Page content for documents that utilize the newer, enhanced format (as applicable), follow the steps below:
1. From the main menu, click Patients and then select a patient.
2. Click the Documents tab.
3. From the display grid, click the corresponding row of an applicable document that you want to validate.
4. Click .
● If any errors are present, the software will automatically open the document.
● If no errors are present, a "Document is Valid" confirmation message will display.
|
|
The Validate button is available in the Documents tab regardless of document version, but will only be available inside documents that utilize the newer, enhanced format and contain an End Visit Date/Time section. |
5. While viewing the HIS document that contains errors, click the Validation complete icon at the top to view a complete list of any errors and/or warning that are present.
● All validation issues must be corrected before the HIS document can be signed and locked.
● If any errors are present, the Validation complete list will display in red.
● For HIS documents, the Validation complete list will display in yellow if there are only warnings present in the document.
● If desired, users can click  to generate a printable .pdf file that contains a list of validation errors for the document.
6. Using the Validation complete drop-down list as a reference, work through the document to correct all errors and/or warnings that are present in the document.
7. To ensure all issues have been corrected, click the button located to the bottom-right (while viewing the document).
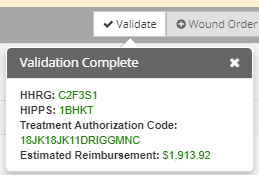
8. Once validation is successful, a Validation Complete confirmation message can be viewed by clicking the  button at the top.
9. Proceed through the documentation process by either completing or signing/locking the document.